
Imagine waking up in a sunlit loft, surrounded by reclaimed wood walls and the quiet hum of nature outside.
No, this isn’t a trendy Airbnb—it’s your shipping container tiny house. Over the past decade, the tiny home movement has exploded, and for good reason.
People are ditching oversized mortgages for simpler, greener, affordable, minimalism and more sustainable living. But why shipping containers?
These steel structures, originally designed to transport goods globally, offer durability, modularity, and a unique industrial aesthetic.
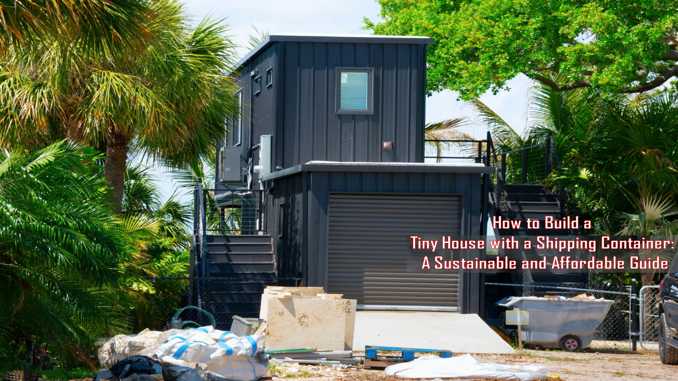
In this guide, we’ll walk you through the process of building a shipping container tiny house, from planning and design to insulation and interior finishing.
Why Choose a Shipping Container for Your Tiny House?
Before diving into construction, let’s explore why shipping containers are an excellent choice:
-
Durability
Made from weather-resistant Corten steel, shipping containers withstand harsh conditions, including heavy winds and corrosion.
-
Affordability
Used containers cost between 1,500–1,500–4,500, making them cheaper than traditional building materials.
-
Sustainability
Repurposing containers reduces waste and minimizes the need for new construction materials.
-
Modularity
Containers can be stacked or joined to create multi-level or spacious layouts.
-
Speed of Construction
With a pre-existing structure, you’ll save time compared to building from scratch.
Step 1: Plan Your Design and Budget
a. Define Your Needs
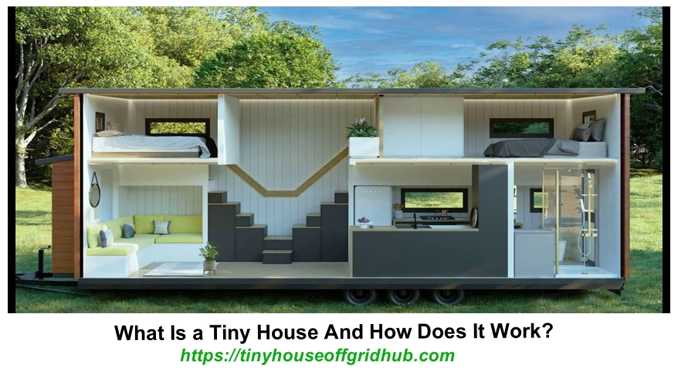
Determine the size and layout based on your lifestyle. Standard containers are 20 or 40 feet long, 8 feet wide, and 8.5 feet tall. A 20-foot container offers 160 sq ft, while a 40-foot unit provides 320 sq ft. Consider combining multiple containers for more space.
b. Set a Budget
Costs vary based on container condition, location, and customization. A basic DIY build can cost 10,000–10,000–30,000, while high-end designs may exceed $50,000. Factor in:
- Container purchase (1,500–1,500–10,000)
- Foundation (1,000–1,000–5,000)
- Insulation and utilities (3,000–3,000–10,000)
- Interior finishes (5,000–5,000–15,000)
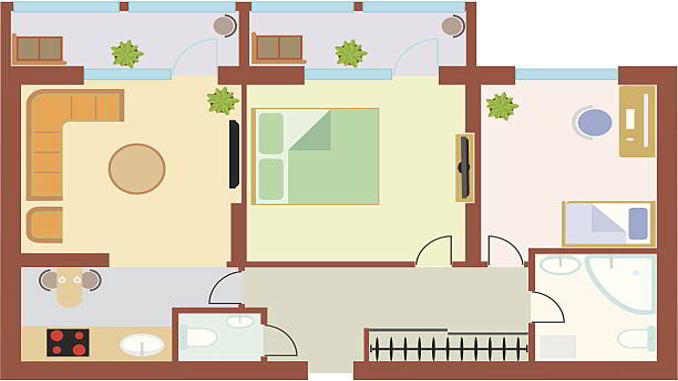
- Create a Floor Plan
Use 3D design software (like SketchUp) or consult an architect to optimize space. Prioritize functional zones: sleeping lofts, kitchens, bathrooms, and storage.
Step 2: Source and Prepare Your Container
a. Choose the Right Container
- New vs. Used: New (“one-trip”) containers cost more but require less refurbishing. Used containers are cheaper but may have dents or chemical residues.
- Check Condition: Inspect for rust, structural damage, and hazardous materials (e.g., lead paint).
b. Secure Permits
Local building codes and zoning laws may restrict container homes. Contact your municipality to confirm requirements for foundations, setbacks, and utilities.
c. Prepare the Site
Level the ground and install a foundation. Options include:
- Concrete Piers: Affordable and ideal for uneven terrain.
- Slab Foundation: Provides stability and insulation.
- Trailer Mount: Makes your tiny house mobile (perfect for avoiding zoning issues).
Step 3: Modify the Container
a. Cut Openings
Use plasma cutters or angle grinders to create windows, doors, and skylights. Reinforce cut sections with steel beams to maintain structural integrity.
b. Insulate Thoroughly
Containers conduct heat, making insulation critical. Popular options:
- Spray Foam: High R-value and moisture-resistant.
- Panel Insulation: Easy to install but requires vapor barriers.
- Eco-Friendly Wool: Natural and non-toxic.
c. Install Utilities
- Electrical: Run wiring through walls and connect to solar panels or the grid.
- Plumbing: Use PEX piping for water supply and install a composting toilet to save space.
- HVAC: Mini-split systems or propane heaters work well for climate control.
Step 4: Interior and Exterior Finishing
a. Walls and Flooring
- Line walls with plywood, reclaimed wood, or drywall.
- Install waterproof flooring (vinyl, bamboo, or polished concrete).
b. Maximize Space
- Use multifunctional furniture (e.g., fold-down tables, Murphy beds).
- Build vertical storage with shelves and loft areas.
c. Exterior Upgrades
- Add cladding (wood, metal, or stucco) for aesthetics and insulation.
- Install a green roof for temperature regulation and eco-appeal.
Step 5: Navigate Legal and Safety Considerations
- Permits: Ensure your build complies with local codes for electrical, plumbing, and structural safety.
- Ventilation: Prevent condensation with vents or dehumidifiers.
- Fire Safety: Use flame-resistant materials and install smoke detectors.
Cost Breakdown: Sample Budget for a 20-Foot Container Home
| Expense | Estimated Cost |
| Shipping Container | $2,500 |
| Foundation | $2,000 |
| Insulation | $1,500 |
| Windows/Door | $1,200 |
| Plumbing & Electrical | $3,000 |
| Interior Finishes | $4,000 |
| Total | $14,200 |
Pros and Cons of Shipping Container Homes
Pros:
- Eco-friendly and cost-effective.
- Quick to assemble with modular design.
- Extremely durable and portable.
Cons:
- Limited space without combining units.
- Insulation challenges in extreme climates.
Potential zoning restrictions.
Final Tips for Success
- Start small with a single-container design for your first project.
- Work with professionals for welding and structural modifications.
- Prioritize energy efficiency with solar panels and LED lighting.
- Join online communities (e.g., Reddit’s r/containerhomes) for inspiration.
Conclusion
Building a tiny house with a shipping container blends creativity, sustainability, and practicality. By following this guide, you’ll transform a steel box into a cozy, functional home that reduces your carbon footprint and living expenses. Whether you’re downsizing or seeking an off-grid adventure, a container home offers endless possibilities to redefine modern living.
Ready to start your project?
Share your journey with https://tinyhouseoffgridhub.com in the comment box below and inspire others to embrace sustainable housing!